Excerpts from How to Read a North Carolina Beach by Orrin H. Pilkey, UNC Press
Are mud balls and tar balls natural?
How does air move in the sand?
Where does all the air come from in a beach?
What is singing or barking sand?
Drift Lines
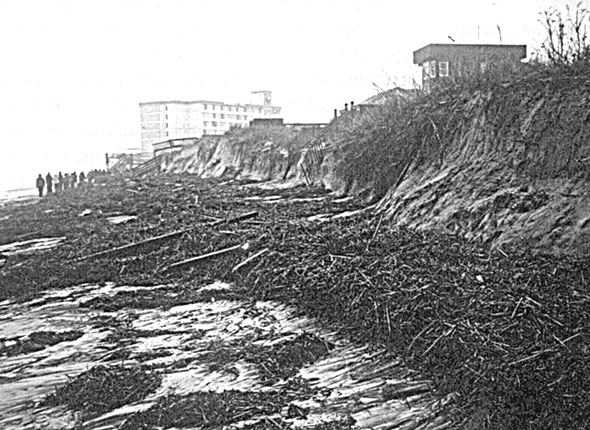 Figure 5.2. A wrack of Spartina (salt marsh) straw and wood from destroyed decks and dune walkovers in South Nags Head during a nor’ easter in 1998 The Comfort Inn at Whalebone Junction is in the background.
Much of the extraneous material on beaches is found in drift lines (wrack lines) which are the linear piles of natural and man-made objects that are left behind at the uppermost limit of the wave swash (Figure 5.2). The positions of the drift lines are a good indicator of the high tide or storm wave limit. On some beaches, especially the undisturbed ones, as many as three separate wrack lines can sometimes be seen. The lowest line of debris marks the normal high-tide line. The next line, a foot or two higher, is from the last Spring or full-moon tide, and the highest wrack line is from the last big storm. A walk into the dunes, into the center of the island, far from the shoreline, may reveal old lines left from significant flooding as long ago as 10 or 20 years.
The human-made flotsam and jetsam in drift lines is in significant part derived from offshore. Containers of alcoholic drinks seem to prevail followed in abundance by paint, soap and various chemical containers. Each beach seems to have a different type of trash depending on whether the main villains are commercial fishing vessels, naval vessels, smaller recreational fishing boats or the mighty freighters that ply the Gulf Stream and beyond. On some islands baseball caps, blown off the heads of passengers in speeding skiffs, are surprisingly abundant. In this age of souvenir caps the logos reveal cap origins not unlike the way heavy minerals in beach sands reveal their source rocks.
Before human beings began contributing substantially to the content of wrack lines, the debris consisted primarily of organic material. The major constituents were driftwood, seaweed and especially salt marsh (Spartina) straw. Both the driftwood and the saltmarsh straw came from the sound behind the island, carried out to sea, through the inlets by tides and winds. These natural wrack lines furnished the organic material to newly formed (or newly migrated) barrier islands that was necessary to nourish the start of growth of vegetation on islands.
Are mud balls and tar balls natural?
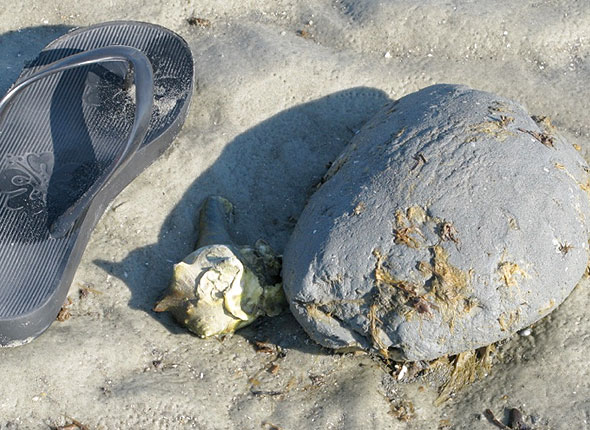 Figure 5.3. These ephemeral mud balls on Little Tybee Island, Georgia (USA) are chunks of well-compacted mud that have broken off an outcrop and have rolled about in the wave swash to become rounded. These are natural mud balls, but unnatural mud balls can be a common feature of nourished beaches. Sandal for scale.
Mud balls are another post-storm debris component. These globs of clay or mud erode out of the highly compacted underlying marsh sediments that crop out on some beaches or migrating barrier islands (Fig. 5.3). The mud balls are rounded by the waves and roll up onto the beach during big storms. Sometimes mud balls can be covered with a layer of shell fragments or sand that have stuck to the outside of the clay as it rolled around with the waves, producing an armored mud ball.
Some beach nourishment projects also bring mud balls up to the beach. The dredges, that pump sand from offshore, suck up rocks or chunks of clay sediment from the seafloor along with the sand.
Tar balls also occasionally wash up on our beaches. These sometimes soft, sometimes hard, rounded tar masses are from oil spills, large and small. The older the spill, the harder the ball. The volatile components have evaporated away, leaving only viscous tar. Children seem to have a special skill at finding tar balls, stepping on them and then transferring the material to beach cottage interiors!
How does air move in the sand?
The movement of the tides up and down the beach every half day or so is a highly visible process carefully watched by fishers, beach buggy enthusiasts and joggers alike. While all these obvious changes are occurring on the beach, important but much less visible things are happening beneath the surface. As the tide goes out, air replaces water between the sand grains. As the tide comes up, water replaces air. The beach is a giant bellows, alternately taking in and expelling air. As the air passing through the sand, a great variety of features form within the sand as well as on the surface of the beach.
You can watch for yourself as air is forced out of the beach. The best time and place to see this is at mid to upper incoming tide levels on the upper beach near the high tide line. If conditions are right, streams of bubbles can be seen through the thin water film of the uppermost wave swash, especially as the swash begins its return to the sea.
Nail holes and volcanoes
 Figure 5.4. Nail holes and small pits, a common beach sight all over the world. These are found most easily on a rising tide above the swash zone. Pits are the holes surrounded by small depressions. As is usually the case, the nail holes in this photo far outnumber the pits. A beach with so many holes is usually one that has been recently accreted (built up), and the bubbles occur in the “new” sand.
The expelled air forming the visible bubble trains in the swash usually is emitted from cylindrical, tube-like holes that have the diameter of a household nail (Fig. 5.4). Our informal term for these (naturally) is nail holes. These are of variable diameter but none are larger than the diameter if a large nail. If you count them you will find that they occur in densities of 5 to 100 holes per square foot. They have a patchy distribution, many here and none over there, for no obvious reason (a mystery to be solved?). We have talked with many people on the beach about these holes and almost without exception it is assumed that they are critter holes. Indeed we have seen sand fleas jump into the holes, but we believe their origin is related to air rather than animals.
When the tide has left the bubble area high and dry, a careful look (on hands and knees) will reveal that some of the nail holes resemble tiny volcanic cones. With a magnifying glass and imagination, we call these features volcanoes. The uppermost part of the hole flares out and is rimmed by a tiny circular mound of sand (Fig. 5.5). The flow of air through the holes was strong enough to remove some sand at the surface and pile it around the rim. Again, if you are watching the swash zone at the right time you can see the tiny eruptions from the holes that expel water and the sand that produces the rim.
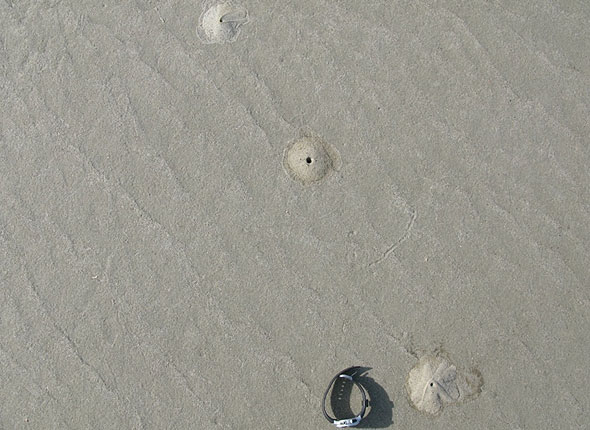 Figure 5.5. Volcanoes on the beach! These features are formed when a relatively large volume of air escapes the beach. Accompanied by water, the escaping air brings with it sand that piles up into a cone. Wrist watch for scale.
Blisters
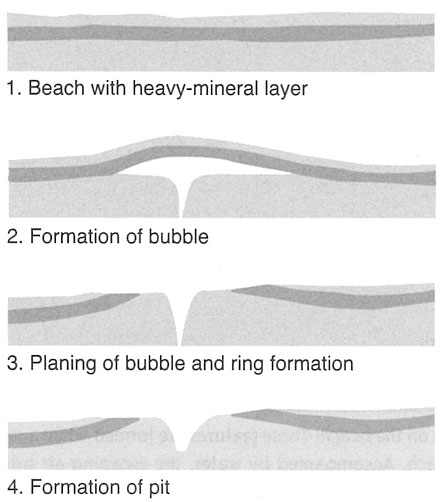 Figure 5.7. Idealized cross-sections showing the formation of a blister and its evolution into a ring and a pit. When the domed heavy-mineral layer is truncated by erosion, the visible ring is produced on the beach surface. Drawing: Charles Pilkey
Sometimes the upper most layers of the beach resist the break through of the escaping air. Instead of forming a hole to release the air escaping from the beach, the sand is forced up into a mound or blister; perhaps an inch or two in diameter and extending above the beach surface a fraction of an inch (Fig. 5.6). Careful dissection of blisters with a pocketknife reveals a small dome shaped pocket of air beneath a nail hole; sort of like an air pocket in a souffle. Both blisters and volcanoes seem to occur with lower densities than nail holes, 1 to 5 per square foot. Blisters, volcanoes and nail holes often will form at the same time and place on the beach. The reason a blister sometimes forms, rather than a simple hole, is that the upper most layers of sand in the beach may be slightly consolidated or very lightly cemented by an organic film. The cementation may be due to microscopic salt crystals that have precipitated out of salt water in the pores between the sand grains. This cement is called salcrete and can often be seen or felt by barefeet on the upper-most beach, usually above the high tide line.
After a blister forms a subsequent wave swash may rush up the beach and decapitate or breach the structure. If a heavy mineral layer was incorporated in the former blister top, a black ring forms on the beach (Figs. 5.7). Until we observed how these rings formed, they were a major riddle for us and the topic of many discussions and arguments while standing on the beach. Sometimes removal of the blister by the next swash leaves behind a small, circular depression or pit that is larger than a volcano and doesn’t have the rim that characterizes a volcano (see Fig. 5.5).
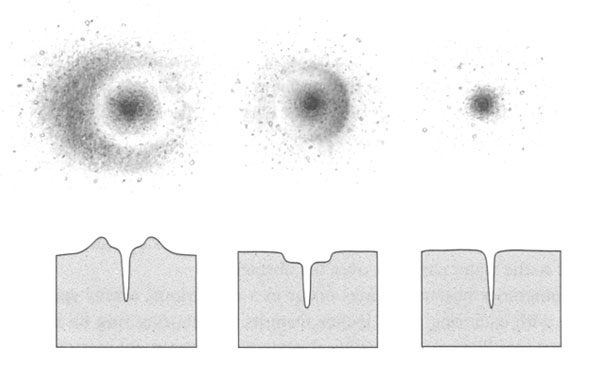 Figure 5.6. Comparison of a volcanoe, pit, and nail hole on the surface. Some pits and nail holes may be volcanoes truncated by swash erosion, but pits and nail holes also form independently of volcanoes. Drawing: Charles Pilkey.
Air structure organization
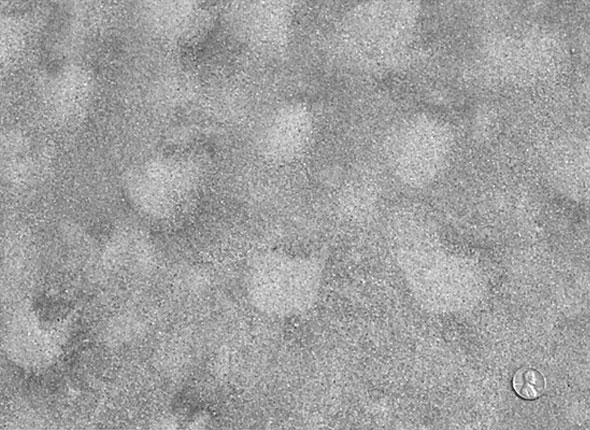 Figure 5.8. Rings on pea Island, Spring 2002. These rings have faded a bit, but probably because it has rained since their formation. Faint raindrop imprints are visible in the photo. The regular spacing of the rings is probably due to the escape of air through a very uniform layer of sand. Another riddle in the sand! Penny for scale.
Holes, blisters, rings and pits on the beach sometimes form in distinct lines. Commonly the line forms as the wave swash tumbles into the track left on the beach by a vehicle. As the swash tumbles into the tire depression, air is forced out of the beach. The air escapes as a spectacular row or chain of bubbles, visible as long as water remains in the old track. Sometimes the swash removes all evidence of the tire track and only the line of holes or blisters remains. Even footprints in the sand and pieces of debris on the beach will promote the formation of bubbling holes, but they form on smooth beaches without obstructions as well.
Under the right conditions and with a little practice it is possible to manufacture your own line of holes on the beach. Take a long piece of driftwood and place it high enough on the beach where the swash will run over it, but not move it. You will observe a line of bubbles emanating from the sand as the water cascades over the obstacle.
Sometimes blisters or rings will occur in a mysterious evenly spaced pattern, each ring a few inches from its neighboring ring on the beach surface. This rather spectacular arrangement may cover a few square yards of beach above the water line (Fig. 5.8). Our explanation for this incredibly symmetrical pattern is that it is formed as air rises through a section of beach that has very uniform sized sand without irregularities like seashells. Another riddle.
Soft sand
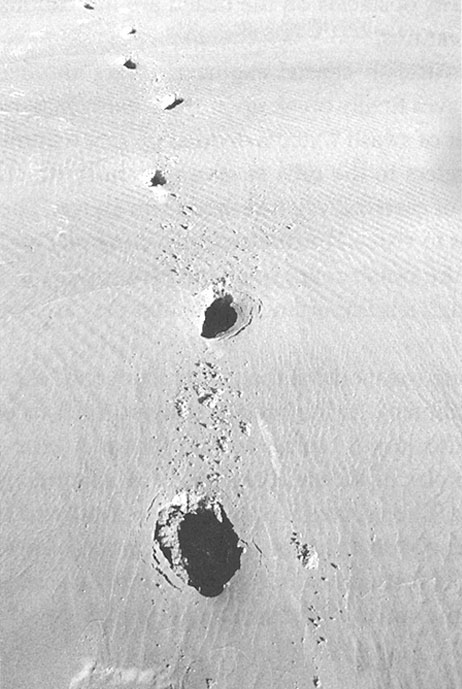 Figure 5.10. Footprints in bubbly sand. Whoever walked across this patch of bubbly sand at Mason Inlet suddenly found the going quite tough.
The same mechanism that pumps air into the beach to form holes, blisters, pits and volcanoes is also responsible for soft sand. Water rising with the tide below the surface of the beach forces air up through the sand which, when it cannot escape rapidly enough, causes bubbles to form within the uppermost sand layers. Our name for this phenomenon is bubbly sand.
When you walk across bubbly sand, which may have no surface expression to warn you of its presence, your weight collapses the bubbles. Your feet sink into the sand and suddenly an easy stroll on the beach becomes a lot more exercise (Fig. 5.10).
It is easy to see the bubbles in the sand that are causing your footprint to be much larger than it was on nearby hard sand. Force your hand into the sand and bring up a chunk of the beach with a fresh fracture face. On the sharp face of this piece of the beach you are holding, you will see large and small cavities that were formed by the air forced into the beach. It may take several tries to perfect the sampling technique, but it works. Breaking the chunk of sand apart sometimes reveals cavities concentrated along the horizontal bedding planes. In these cases, the air was forced into the beach vertically and then flowed horizontally between layers of sand grains of differing grain sizes.
Soft or bubbly sand typically forms in the upper beach on relatively flat beach areas when the waves are pushing new sand up onto the beach, as when the beach is recovering from a storm. Immediately after a storm, there is usually no soft sand and beach strolling is much easier. The same is true for blisters and nail holes. Freshly deposited sand is more amenable for such features to form in, relative to a fresh erosion surface on the beach.
Bubbly sand must be quite uniform in grain size and contain few shell fragments. Finer-grained sand seems to be much more susceptible to bubble formation than coarse sand. This may be because air does not travel as rapidly through a wet fine sand relative to a wet coarse sand.
If you come upon a zone of very soft, water-saturated sand, tap your foot repeatedly on the same spot. In doing so, you may cause the sand to become quicksand or to liquefy. The vibration causes the packing of the sand grains to be disturbed and the bubbles to collapse; water surrounds the grains and the sand, at least the upper few inches of it, behaves as a liquid.
Where does all the air come from in a beach?
It probably involves several mechanisms the most important of which is simply the falling tides. Air rushes in to fill the intergranular cavities. When the tide rises the incoming water pushes out the air. But we think that a lot of the air formed features on beaches may be in response to processes in the upper few inches in the beach. The formation of bubble lines in tire tracks and on the landward side of obstacles on the beach are indications of shallow genesis of these features.
Sam Smith, an observant Australian coastal engineer, offers another explanation. He notes that as the waves finally breakup into a sheet of swash, surging up a beach, the thin layer of swash water is divided up into a number of cells (Fig. 5.11). Smith refers to the cells as “swash footballs” which more or less describes the shape of each cell when viewed from above. The best way to see swash footballs is to visit a North Carolina fishing pier and walk out to a position just over the swash zone. Look for a pattern like the one shown in Figure 5.11, although it is important to note that they are not always there.
Each of these cells is a separate wave orbital that at the front end captures air and forces it into the sediment. At the backend, or seaward end, air is sucked out of the sand. Swash after swash pumps air into the sand, creating ever more bubbles and air holes in the sand, and perhaps expanding some holes that are already there. The process is poorly understood and it is not absolutely certain that it is of consequence in the formation of nail holes and blisters. This is a riddle that someone (not necessarily a scientist) standing in the swash zone for many hours might solve.
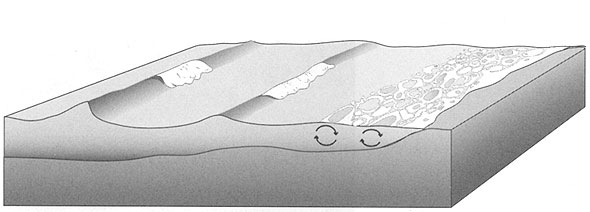 Figure 5.11. Idealized diagram, both cross-section and overhead view, of the swash zone footballs and the wave orbitals associated with them. These orbitals may constitute one of the methods by which air is forced into or out of the beach. Drawing: Charles Pilkey.
Bedforms
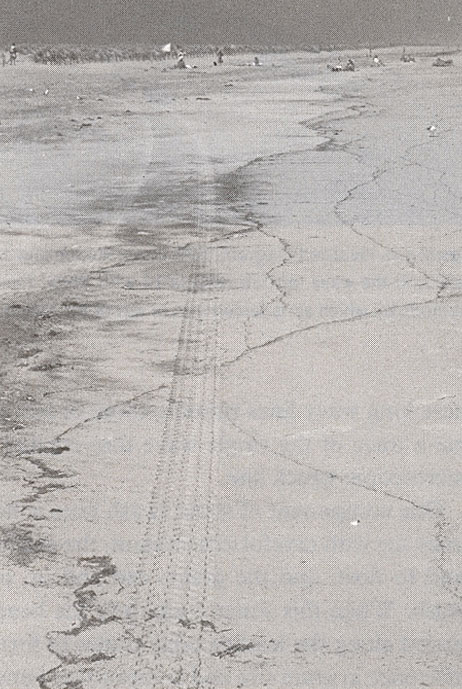 Figure 5.12. Swash lines along with a tire track extending far down the beach. Each line represents the furthest incursion of wave wash upon the beach during a falling tide.
The surface of the beach is like a canvas painted in diverse patterns. Each pattern reflects a difference in the history of the manner that currents, waves and winds and organisms operate on the beach. These bedforms, a general term for all small scale features on the surface of the beach, form as a result of a huge number of physical processes acting in combination. Each type of bedform provides clues to processes that created them, but as in the case of the features formed as air moves through the beach, we still have a lot to learn about them.
Swash marks are one of the more prevalent bedforms. The mark is a minute ridge of sand or debris left behind by the most landward reach of an individual wave swash (Fig. 5.12). At low tide, the entire beach may be covered by these long wavy lines, running more or less parallel to the beach length, each a trace of the single wave that created it. The swash mark is like a microscopic wrack line. Raindrop imprints may be the second most common bed form on beaches and dunes. In heavy rains, most other bedforms will be wiped out to be replaced by a surface of small pits.
A less puzzling texture commonly found on beaches is raindrop imprints (Fig. 5.16). The impact of raindrops during a heavy rain will indent the sand surface. As the rain soaks into the sand, a textured surface full of irregular pits is left behind. These imprints are easily washed away by the next high tide or disruption to the beach (e.g., vehicular traffic, dry winds), so they usually don’t last long. In contrast, the rain drop impressions made on the surface of bare dunes may persist for days. Raindrop imprints have even been found in many ancient sandstones, millions of years old, so under the right conditions “permanent” preservation of these ephemeral features can happen.
 Figure 5.16. Raindrop imprints on top of ripple marks. Penny for scale.
One component of swash lines often is floating sand. With careful observation on wet knees, sand sometimes can be seen floating on the surface of the swash. Surface tension of the water allows sand to float and the grains often end up on the advancing edge of the swash. When this water soaks into the beach, some of the floating sand carried along the leading edge settles to form the swash mark. The slight difference in grain size and composition between the floaters and the beach is one reason that swash marks stand out in relief.
The swash commonly aligns the surface sand grains as it washes over the beach face and leaves streaks of various kinds on the beach surface reflecting the up and down motion of the swash. This pattern, which may consist of faint irregularities, streaks or micro ridges and grooves up and down the beach or perpendicular to swash marks, is called parting lineation.
Sea foam
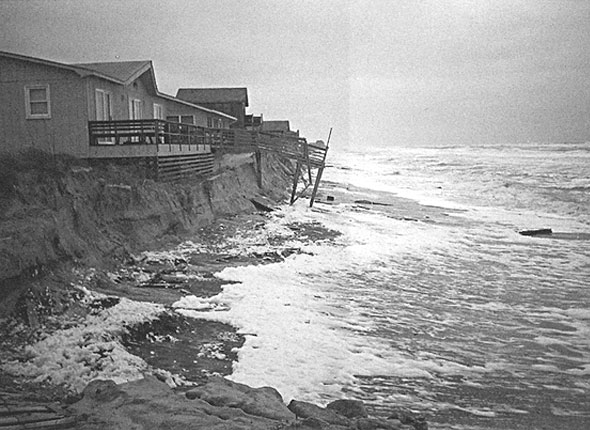 Figure 5.13. Foam on the upper beach at Nags Head during a nor’ easter in February 1998.If the storm persists long enough and if the winds are onshore, the foam will pile up into thicknesses of several feet against the dune scarp. Note the large dune erosion scarp and the fragments of dune walkovers in the surf zone.
Sea Foam is responsible for one of the more puzzling riddles of the sand, especially if one comes upon it hours after the storm has dissipated and the foam is gone. Sea foam looks like someone poured bubble bath into the waves! Foam forms naturally as pounding storm waves churn up of seafloor sediments. This process extracts organic matter from the sediment on the seafloor and violently churns it all up to form the white, bubbly mass known as sea foam. Often a thin film of inorganic clay particles (mud) is attached to the bubbles, so when the foam bubbles eventually collapse, a thin film of gray colored mud is left behind on the upper beach or wherever the foam comes to rest. Those who have waded through a pile of foam have noticed that same gray film on their clothes!
Sometimes after a big storm the foam can accumulate to a thickness of several feet where the shoreline is backed by a vertical dune scarp or some other obstacle (Fig. 5.13). We have walked into piles four feet thick against a dune scarp in North Carolina. If there is nothing to block the foam from blowing ashore, it will accumulate up against buildings or on nearby streets. At the height of a storm it is common to see flying clumps of foam.
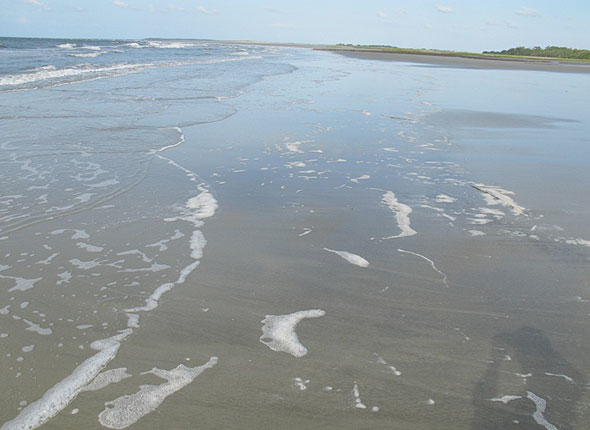 Figure 5.14. Patches of foam on a beach in Georgia, USA. Foam is created from organic matter stored in sediment and later stirred up by wave action. Foam may accumulate in piles several feet thick when it is blown up against some obstacle such as a dune erosion scarp.
During fair weather conditions, small amounts of foam are a common occurrence in the surf, where the waves are breaking, and swash zone, where the waves are washing up on the beach (Fig. 5.13). A distinct foam swash line remains behind. As clumps of foam are carried or rolled up the beach they leave a very fine track across the sand, equal in width to the diameter of the clump. Typically, foam stripes occur in parallel tracks in the direction of the wind, leaving a distinct pattern on the beach. Clumps of foam may also be carried across the beach by the wind in a hop, skip, and jump fashion; leaving intermittent traces or foam tracks where the clump touches down on the beach (Fig 5.14). Where a patch of foam comes to rest, a final set of bubble impressions may be left in the surface of the sand. All of these features are very fine and difficult to see. They are best observed as they are forming, but once you’ve seen them form you will be able to find such traces well after the foam has disappeared.
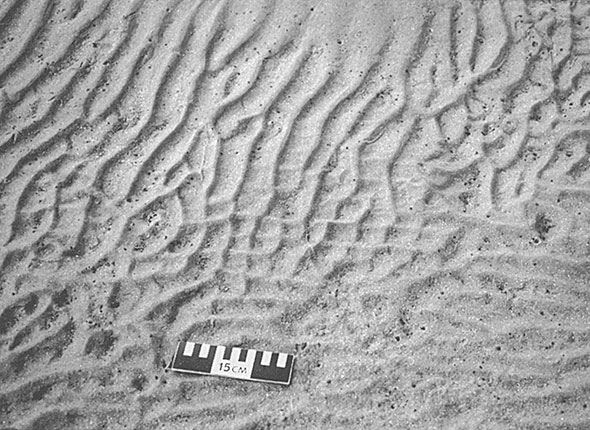
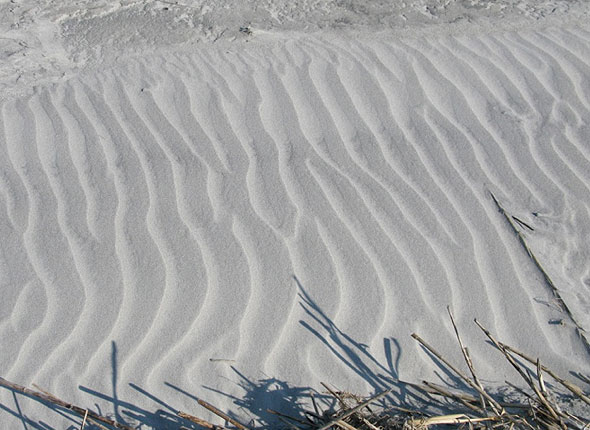
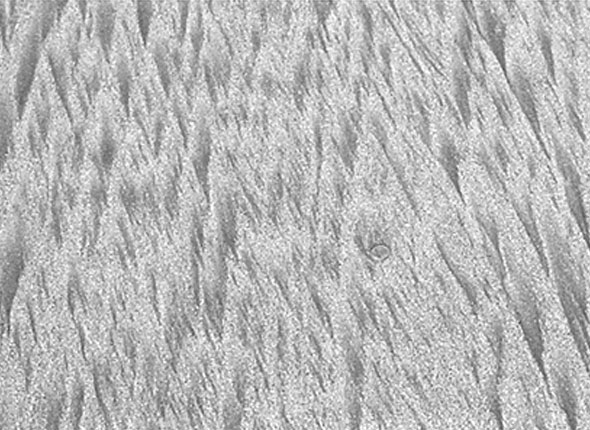
Ripple mark formation
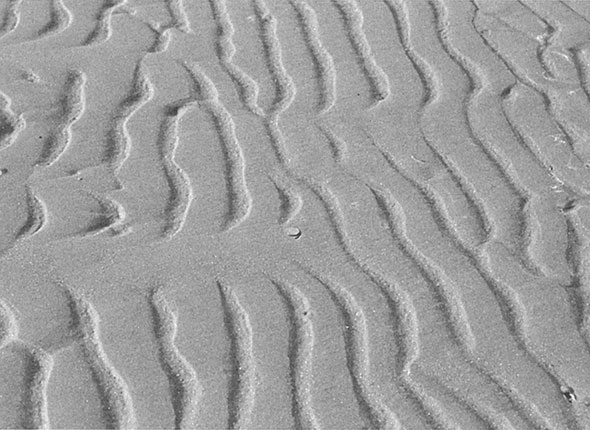
Ripple marks are one of the most common bedforms found in the intertidal zone of the beach. They are also a very common feature in ancient rocks. Ripple marks form any place where there are the right kind of winds, waves and currents. They form on the dunes, the beach, on the shoreface, or way offshore on the continental shelf. In fact they can form anywhere in the oceans. These low ridges of sand line up in a repetitive pattern perpendicular to the direction of the water current or wind that created them. They look like miniature dunes and can cover very large areas. Ripple marks are formed in the sand by wind or water moving over the surface at a high enough velocity to move sand. Because ripple marks are found in ancient rocks they have been studied of in detail over the years in the hope of using them to determine the geologic history of rocks. We’ll only scratch the surface of ripple marks.
Of the numerous varieties of ripple marks that exist, many beaches frequently have both long-crested or wave ripples, and irregular short-crested or current ripples.
Although wave ripples can be nearly symmetric, the fact that waves are directional means the ripples are moving forward, so they are usually slightly asymmetric in their cross section. Each individual ripple is like a wave in its geometry with a crest and trough. The crests of adjacent ripples may be straight or gently curved (sinuous), but are semi-parallel, and the ripple has one side that is gently sloping while the other side is steep. The steep side faces in the direction that the current is moving. To observe this type asymmetry, you may have to get down close to the beach surface or look at the beach from different angles to catch the light and shadow effect to determine the ripple symmetry. In some wave ripple sets the parallel crests occasionally converge to form zigzag junctures.
Ripple mark types
 View Ripple Mark Gallery
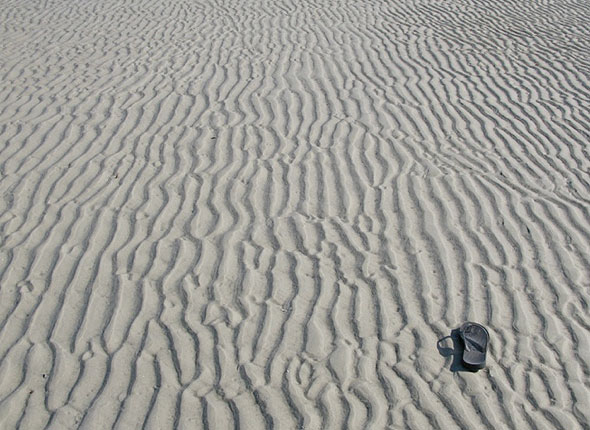
Ladder-back ripples
Flaser ripples
Antidune bedform on the lower beach
Wind-ripple marks
Arc-shaped tracings
Wave ripples are forming somewhere in the nearshore most of the time, both on the rising and falling tides. As conditions change a newly formed set of ripples may be washed out, only to reform again on the next tidal cycle. Sometimes a well-formed set of ripples will be modified without being destroyed as a new set of wave dynamics take over. A variety of ripple forms result, including flat-topped ripples (Figs. 5.16 and 5.17) in which the ripple crests are truncated by erosive conditions; interference ripples that form when waves come from different directions during the formation of the ripples, as in areas where sand bars create different wave-refraction patterns; and ladder-back ripples (Fig 5.18) where a slightly younger set of ripples forms atop or across a pre-existing set of ripple marks as on tidal flats during rising and falling tides. Flaser ripples (Fig. 5.19) have mud in the troughs between the ripple crests which reflects a calming down of conditions leading ultimately to still water in which mud is deposited.
Where water flows as a current in a trough or channel, such as in a trough or runnel, current ripples form. These ripples are usually much more asymmetric in cross section than wave formed ripples, but their crests are less continuous and are not necessarily parallel to the crests of adjacent ripples. When you look down on them the shapes of the ripples can show a variety of forms, and typically these shapes are used to describe the ripples. For example, groups of ripples or ripple trains may be described as linguoid, cuspate, lunate, or catenary.
A good place to watch ripple marks form and still keep your feet dry, is on a trough on the beach (the backside of a berm) that is still filled with water on the ebbing tide. As the tide continues to fall the trough will drain and even though the water is only inches in depth, a moderately swift flow will begin to move the sand grains, shaping the trough floor into a field of current ripple marks. The sand grains can be seen moving up the gentle backside of the ripple and either jetted off the crest or falling into the trough of the ripple’s leading edge. The ripple can be seen to migrate downstream. In some instances, dark heavy-mineral grains or coarser shell particles will selectively accumulate in the ripple troughs, making the shape of the structure more apparent.
Another ripple form that develops on the falling tide is the antidune (Fig. 5.20). The name derives from the fact that the steep face looks upstream, just the opposite of most ripples and dunes. This reversed orientation develops on the beach when backwash flows rapidly down the beach and a gentle wave-like bedform develops that is in phase with the water surface. Watch the backwash after a wave breaks and for a brief instant this surface is visible although the ripple bedform is not. As the tide continues to fall, however, this part of the beach becomes emergent and wide stripes appear on the beach marking the positions of antidune bedforms. Dark heavy minerals are often preferentially concentrated, in troughs enhancing the appearance of the stripes.
Wind formed ripple marks
Ripples can also be found on the upper beach above the high tide swash mark and in the dunes, where wind is the driving force behind moving the sand. In a fashion similar to the long-crested wave-formed ripples, wind ripple marks (Fig. 5.22) on sand dunes are rhythmic, long crested, and asymmetric in cross section. They line up parallel to each other, perpendicular to the direction of the latest winds, with the steep face in the direction of that latest wind. Wind direction may change several times a day, so wind-ripple orientation will change as well, and in quick fashion. Typically, the troughs of wind ripples are shallower than wave ripples and as a result it may be difficult to distinguish their asymmetry. Again, dark heavy-mineral concentrations in the troughs may produce visible stripes that make ripple shape more apparent. These dark-colored heavy minerals are concentrated as the wind selectively transports the lighter density minerals faster than the heavy ones.
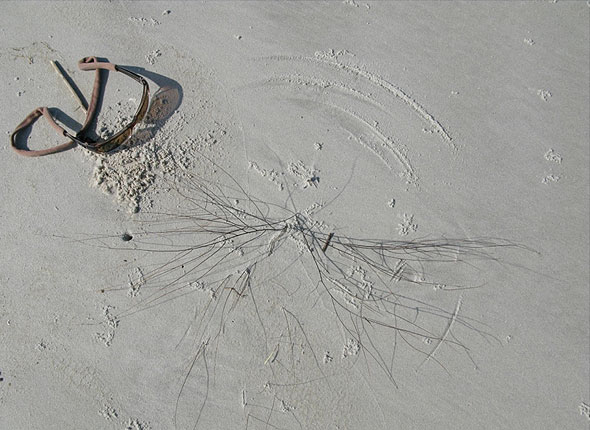
In addition to ripples, the wind leaves other surface markings on beaches and dunes. As noted earlier, when foam is blown across the beach a bubble track or foam stripe results. If an object is drug over the surface by swash or wind, a drag mark results. The object being moved is referred to as a “tool” and a variety of puzzling patterns can develop depending on the type of tool. In the dunes, the tip ends of grass fronds, plant leaves and exposed rootlets etch curious feather-like patterns on the surface of the sand when the plant is blown about by the wind. These plant scratchings often form a distinctive arc-shaped ring or plant arc (Fig. 5.23) or scribe mark.
Adhesion ripples and related adhesion structures are another set of wind-developed bedforms. Sand blowing over a wet surface will begin to stick or adhere to the surface. Capillary action continues to move water up between the grains and more wind-blown sand sticks to the surface. The resulting adhesion surface may have an irregular ripple form, or the surface may have a scabby or wart-like pattern (Fig 5.24). Often these surfaces develop adjacent to the trough (runnel) on the beach at low tide. The surface is wet as water drains out of the beach, and traps sand being moved by the wind over the beach.
Rhomboid ripple marks and crescent marks
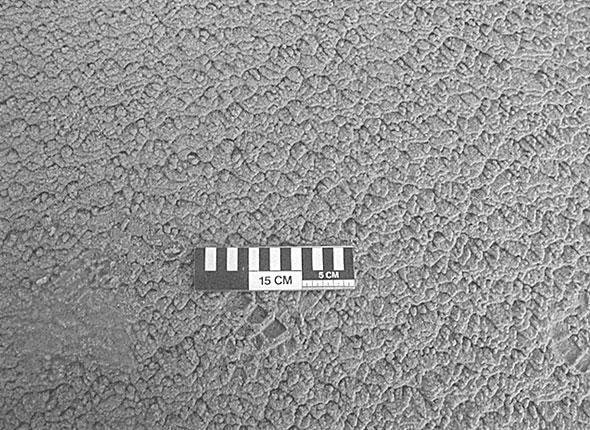 Figure 5.24. Adhesion ripples form as dry sand is blown over very wet sand, creating this strange knobby surface.
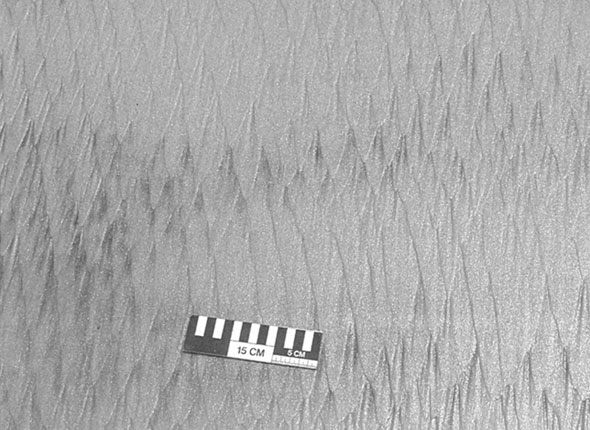
Rhomboid ripple marks are a special kind of beach bedform (Fig. 5.25 and 5.26). These V-shaped features form as wave swash goes back and forth in a receding tide. The V’s always point toward the land. The pattern may also be produced by backwash around objects on the beach such as shells.
Patterns on the beach often are generated where even the smallest obstruction interferes with water or wind current flow. Pebbles and larger shells cause the flow around them to scour the sand, creating current crescent marks. Where the wind blows over such coarse particles, tiny windrows of sand build up behind each shell or pebble, giving a strong directional texture to the beach which may change as wind direction changes (Fig. 5.26). Similar larger-scale windrows of sand develop on a shelly beach like Shackleford Banks when strong winds in a consistent direction, creating strongly parallel sand rows oriented downwind of each shell.
Often within a short distance across the beach-dune system you will see several different fields of ripple marks. With a little practice you will soon be able to recognize them as signatures of different sets of wave, water and wind current processes.
The best way to understand ripples is to observe for yourself on the beach you know best. Note what kind of ripples form when the wind blows toward the land, when the wave swash is small vs. when it is large, and the differences that develop between wet and dry sand. The observant beach reader, with enough experience, can make sense of the riddle of ripple marks. You can become the world’s leading expert for your beach!
What is singing or barking sand?
The sounds of Nature you associate with a day at the beach may include waves lapping or crashing onto shore, the cry of scavenging seagulls, or a stiff wind blowing past your ears. Walking along the beach may produce a new sound, one that comes from the sand itself. As you tromp along the beach, the sand may sing, bark or squeak at you! It all depends on how you want to describe the sound.
Singing or barking occurs on most sand beaches of the world. It goes by a lot of other names, including musical sand, whistling sand, squeaking sand, and in Japan, frog-sound sand. Whatever the name, the noise is produced when you scuff your feet on certain patches of sand on the upper beach. Sand deposited both by water and by wind may bark or sing.
In order for the sand to sing, all of the sand grains must be of similar size (i.e., the sand must be well sorted). Singing usually occurs when the sand grains are close to spherical and have dust-free surfaces. The sand must also be pollution free. That is it must have no organic matter between or on the grains.
The sound is produced by the shear that occurs when one layer of sand grains slides over the layer beneath it. The grains move in unison over the layer of grains below them. When there is dust or some kind of pollution on the sand grains, the friction between layers is reduced and the sand is silent.
Not all sands bark alike. The noise has a large frequency range and is different for each singing or barking patch of sand. Fine sands (individual grains barely visible to the naked eye) produce only a poor, weak sounding bark. Medium-sized sands can emit a range of sounds, from a faint squeak to a high-pitched sound. The best and loudest barks come from medium sized sand grains.
Water also plays a factor in the ability of the sand grains to produce sound. Although water usually will silence singing sands by causing the grains to stick together instead of shearing past each other, adding small amounts of water to the sand can actually raise the pitch of the squeaking sound. So sand sings primarily on the dry upper beach above the normal high tide line, but some sands have been reported to sing on the lower beach near the low tide line. One theory holds that sand may produce sound under water as waves crash on the bottom under just the right circumstances (whatever these may be).
A cousin to singing sand is “booming” sand, produced as sand slides down the face of large dunes. Booming is primarily a desert phenomenon, but coastal dunes occasionally produce the noise under dry conditions. It is said to be a low frequency roar or groan which can be quite startling, especially at night. Descriptions of booming sand from historical records are surprisingly common. In 9th Century China, groups of people slid down the Mt. Ming-sha-shan sand dunes to announce with thundering sounds the arrival of a boy’s festival day. And in Hawaii, people bestowed a religious aspect to this phenomenon, believing that the booming dunes of Kauai were the sounds of disgruntled spirits.